let db;
let dbReq = indexedDB.open('myDatabase', 1);
dbReq.onupgradeneeded = function(event) {
// Set the db variable to our database so we can use it!
db = event.target.result;
// Create an object store named notes. Object stores in databases are where data are stored.
let notes = db.createObjectStore('notes', {autoIncrement: true});
}
dbReq.onsuccess = function(event) {
db = event.target.result;
}
dbReq.onerror = function(event) {
alert('error opening database ' + event.target.errorCode);
}
To run the JavaScript, put this code in a file named index.html and open it in Chrome:
<!DOCTYPE html>
<html>
<head><title>IndexedDB note store</title></head>
<body>
<div id="app"><h1>Coming soon</h1></div>
<script src="db.js"></script>
</body>
</html>
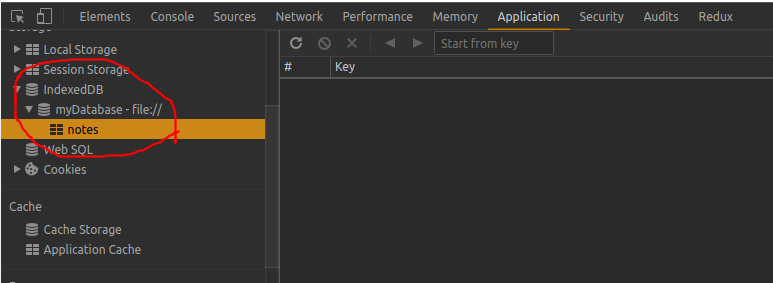
Now in Chrome, go to developer tools, click the application tab, and then click IndexedDB in the left bar, you can see that the database was created!
Cool! We have a database named myDatabase, and there’s an object store (a collection of items, similar to a SQL table or a collection in MongoDB) named notes.
But that seemed like a lot of code for just creating the database and store.
So what’s going on there?
In the first couple lines
let db;
let dbReq = indexedDB.open('myDatabase', 1);
We open version 1 of a database named myDatabase, but indexedDB.open doesn’t return a database, it returns a request for a database because IndexedDB is an asynchronous API.
IndexedDB code runs behind the scenes so if we do something like store thousands of items, the rest of your web app won’t stop running its JavaScript waiting for that to complete.
So in the rest of the code we listen for when ourdatabase is ready for us with event listeners:
dbReq.onupgradeneeded = function(event) {
db = event.target.result;
let notes = db.createObjectStore('notes', {autoIncrement: true});
}
myDatabase didn’t previously exist, so it’s automatically created and then the onupgradeneeded event fires.
In an onupgradeneeded callback, and only in that callback, we can create a database’s object stores.
So first, with db = event.target.result, we set the variable db to hold our database.
Then, we create one object store named notes.
dbReq.onsuccess = function(event) {
db = event.target.result;
}
onsuccess fires after onupgradeneeded completes and it also fires if we refresh the page and open the database again.
So there too, we run db = event.target.result to get our database so we can use it.
dbReq.onerror = function(event) {
alert('error opening database ' + event.target.errorCode);
}
Finally, if something goes wrong on any IndexedDB request, its onerror event fires so you can handle the error however you see fit.
We’re just going to do an alert.
Put some data into the database
Well we’ve got our database, but we can’t do much with it without data.
Let’s add a sticky note!
function addStickyNote(db, message) {
// Start a database transaction and get the notes object store
let tx = db.transaction(['notes'], 'readwrite');
let store = tx.objectStore('notes');
// Put the sticky note into the object store
let note = {text: message, timestamp: Date.now()};
store.add(note);
// Wait for the database transaction to complete
tx.oncomplete = function() { console.log('stored note!') }
tx.onerror = function(event) {
alert('error storing note ' + event.target.errorCode);
}
}
To see this in action, let’s put some call to the function into our dbReq.onsuccess:
dbReq.onsuccess = function(event) {
db = event.target.result;
// Add some sticky notesaddStickyNote(db, 'Sloths are awesome!');
addStickyNote(db, 'Order more hibiscus tea');
addStickyNote(db, 'And Green Sheen shampoo, the best for sloth fur algae grooming!');
}
Now refresh index.html in your browser, go to Application > IndexedDB in developer tools again, click on the object store, and let’s see our data!
Now we have some data stored! And as you can see, our sticky notes in the notes object store are stored as JavaScript objects.
So what was going on in that code?
let tx = db.transaction(['notes'], 'readwrite');
let store = tx.objectStore('notes');
First we start a transaction on our database to write data to our notes object store, and then we retrieve that object store from the transaction.
let note = {text: message, timestamp: Date.now()};
store.add(note);
We represent the sticky note as a JavaScript object and store it in the object store with store.add.
tx.oncomplete = function() { console.log('stored note!') }
tx.onerror = function(event) {
alert('error storing note ' + event.target.errorCode);
}
Finally, just like our open database request, this transaction has event listeners; we listen for when storing the note finishes or where an errror happens with the transaction’s oncomplete and onerror listeners.
Something else worth noting about our sticky notes is that each one has a number for its Key that counts up.
So if you stored another note after those three, its key would be 4.
Where did those numbers come from? In IndexedDB, all objects in an object store have a key identifying them, and when we created the object store with the line
let notes = db.createObjectStore('notes', {autoIncrement: true});
the autoIncrement option says that we want every object in the store to have a key that counts up.
You can also make object stores with string keys if it makes more sense to store and retrieve objects by a unique name (for example a UUID could be a string key for an object store, or if you had an object store of sloths, you could identify each sloth by a string encoding of the tone of their squeak as the key).
Now let’s add this addStickyNote function to our actual web app; we need a text box to submit notes to, so in the <body> tag add these tags:
<!DOCTYPE html>
<html>
<head><title>IndexedDB note store</title></head>
<body>
<div id="app">
<div id="textbox">
<textarea id="newmessage"></textarea>
<button onclick="submitNote()">Add note</button>
</div>
</div>
<script src="db.js"></script>
</body>
</html>
And add this function to db.js that runs every time a user submits a note:
function submitNote() {
let message = document.getElementById('newmessage');
addStickyNote(db, message.value);
message.value = '';
}
Now get rid of the call to addStickyNote in dbReq.onsuccess and then if we go to index.html, we’ll see notes being stored in IndexedDB when we click submit!
Before we go on and I show you how to retrieve the data so we can display it, though, let’s take a detour to talk about a central concept to working with IndexedDB, transactions!
Transactions are king in IndexedDB
As you saw in our last example, to access our notes object store we had to run db.transaction to create a transaction, which is a set of one or more requests to the database.
Everything in IndexedDB happens through transactions.
So storing a sticky note, opening the database, and retrieving your notes are all requests that happen inside transactions.
You can have more than one request in the same transaction too, for example if you’re storing many items in the same object store, all of the store.add requests can be made in the same transaction, like:
function addManyNotes(db, messages) {
let tx = db.transaction(['notes'], 'readwrite');
let store = tx.objectStore('notes');
for (let i = 0; i < messages.length; i++) {
// All of the requests made from store.add are part of
// the same transaction
store.add({text: messages[i], timestamp: Date.now()});
}
tx.oncomplete = function() {console.log('transaction complete')};
}
Just like requests have onsuccess and onerror event handlers, transactions have oncomplete, onerror, and onabort event handlers we can use for responding to a transaction completing, erroring, or being rolled back.
But what exactly are we getting out of putting every request in a transaction? Remember that IndexedDB is an asynchronous API, so it’s possible to have many requests going on at the same time.
Say we had a sticky note in the note store that said “Sloths are awesome”, and we made one request to make the note all-caps and another to add an exclamation point to the note.
Without transactions, we could end up with a situation like this:
We start the makeAllCaps and addExclamation actions and both of them retrieve the unmodified “Sloths are awesome” note.
addExclamation saves the note with an exclamation point first.
makeAllCaps takes longer and it saves the note “SLOTHS ARE AWESOME”, with no exclamation point.
The makeAllCaps update completely wipes out the update from addExclamation!
With transactions, though, we get concurrency control.
Only one transaction can create, modify, or delete items in an object store at a time, so what really happens looks more like this:
The makeAllCaps transaction starts first, but since addExclamation uses the same object store as makeAllCaps, it does not start until makeAllCaps finishes.
So makeAllCaps finishes, addExclamation reads the note in all caps, and then both edits go through! 🎉
That also means if a road was an object store and a streetsweeper and a line painter were running without transactions, the line painter might paint before the streetsweeper moved a branch and you’d get this:
But with transactions, the streetsweeper can sweep branches out of the road and the line painter can paint lines so sloths can safely go for a bike ride!
Before we move on, one other thing to know is that transactions on the same object store only happen one-at-a-time if they’re modifying data; in other words they’rereadwrite transactions, which are created like this:
let tx = db.transaction(['notes', 'someOtherStore'], 'readwrite');
Here we make a transaction that’s readwrite and say that it affects notes and someOtherStore.
Since it’s readwrite, it can’t start until any other transaction touching either of those object stores is done.
While readwrite transactions are one at a time, there are also readonly transactions; you can have as many of them as you want talking to the same object store simultaneously since we don’t need to keep them from messing with each other’s data! You make them like this:
// These transactions can all do their thing at the same time!
let tx = db.transaction(['notes', 'someOtherStore'], 'readonly');
let tx2 = db.transaction(['notes'], 'readonly');
let tx3 = db.transaction(['someOtherStore'], 'readonly');
Retrieving data and displaying your sticky notes
Now that we know how transactions work and how readonly transactions work, let’s retrieve the sticky notes from the note store so we can display them.
If we’re getting just one item from our database, we would use an object store’s get method, like this:
// Set up an object store and transaction
let tx = db.transaction(['notes'], 'readonly');
let store = tx.objectStore('notes');
// Set up a request to get the sticky note with the key 1
let req = store.get(1);
// We can use the note if the request succeeds, getting it in the
// onsuccess handler
req.onsuccess = function(event) {
let note = event.target.result;
if (note) {
console.log(note);
} else {
console.log("note 1 not found")
}
}
// If we get an error, like that the note wasn't in the object
// store, we handle the error in the onerror handler
req.onerror = function(event) {
alert('error getting note 1 ' + event.target.errorCode);
}
We make a transaction, request the note in the note store with the key 1 to get our request, and then we either use the retrieved note in the request’s onsuccess handler, or we handle an error in the onerror handler if we get an error.
Note that if the sticky note does not exist, onsuccess still fires, but event.target.result will be undefined.
The pattern feels similar to the handler we had for opening the database; we start the request, then get the result in the onsuccess handler or handle an error in the onerror handler.
But we want to display all the notes, so we need to get all of them, and for that we use a cursor.
Retrieve all the items in the object store with a cursor has this funky syntax:
function getAndDisplayNotes(db) {
let tx = db.transaction(['notes'], 'readonly');
let store = tx.objectStore('notes');
// Create a cursor request to get all items in the store, which
// we collect in the allNotes array
let req = store.openCursor();
let allNotes = [];
req.onsuccess = function(event) {
// The result of req.onsuccess is an IDBCursor
let cursor = event.target.result;
if (cursor != null) {
// If the cursor isn't null, we got an IndexedDB item.
// Add it to the note array and have the cursor continue!
allNotes.push(cursor.value);
cursor.continue();
} else {
// If we have a null cursor, it means we've gotten
// all the items in the store, so display the notes we got
displayNotes(allNotes);
}
}
req.onerror = function(event) {
alert('error in cursor request ' + event.target.errorCode);
}
}
We create a readonly transaction on the notes object store, we get the store, and then with the store.openCursor() method, we get a request, which means once again we’re working with its results with its onsuccess and onerror handlers to handle the results.
Inside the onsuccess handler, the event’s result is an IDBCursor containing the key of the sticky note the cursor is holding, as well as the sticky note itself as the cursor’s value.
let cursor = event.target.result;
if (cursor != null) {
allNotes.push(cursor.value);
cursor.continue();
} else {
In the if statement, if the cursor isn’t null, that means we have another sticky note, so we add the cursor’s value to our array of notes and continue retrieving notes by calling cursor.continue().
} else {
displayNotes(allNotes);
}
But if the cursor is null, there are no more notes to retrieve, so we display the notes by passing them to a displayNotes function.
Hmm, this cursor.continue() thing feels kind of like a while loop, but there’s no looping or control flow going on.
So how exactly are we looping? This line will give you a hint:
req.onsuccess = function(event) {
It turns out every time you call cursor.continue(), an event fires and sends the cursor with the next item to the onsuccess handler.
So in each onsuccess, we collect another sticky note, until we get an onsuccess where the cursor is null.
That’s how we iterate with cursors.
Now to display these notes, in index.html, after the textbox div, add a div below the text box to store our sticky notes:
<div id="notes"></div>
And in db.js add this function to display the notes:
function displayNotes(notes) {
let listHTML = '<ul>';
for (let i = 0; i < notes.length; i++) {
let note = notes[i];
listHTML += '<li>' + note.text + ' ' +
new Date(note.timestamp).toString() + '</li>';
}
document.getElementById('notes').innerHTML = listHTML;
}
That function just converts each note to an <li> tag and displays them as a list with old-school JavaScript.
Now that we have a function to display all the sticky notes, let’s add it in a couple places.
We’ll want to be able to see all our sticky notes when we first open the app, so when the database first opens, we should have a call to getAndDisplayNotes in dbReq.onsuccess:
dbReq.onsuccess = function(event) {
db = event.target.result;
getAndDisplayNotes(db);
}
And when you add a sticky note, you should be able to see it right away, so in addStickyNote, let’s change the transaction oncomplete callback to call getAndDisplayNotes:
tx.oncomplete = function() { getAndDisplayNotes(db); }
Now reopen the page in Chrome and try adding some more notes.
It should look something like this!
Now for one last thing, let’s make a mode to see the newest notes first and see why this is called IndexedDB!
Indices, putting the indexed in IndexedDB
We’ve got this sticky note store and we’re storing notes with timestamps, so it should make sense that we should be able to retrieve all sticky notes for a time range (like 5–10 minutes ago, or all the notes from a given day) or be able to retrieve them with the newest ones first, right?
Well we can, but to be able to query by the timestamp field, we need to give that field in the notes object store an index.
Once we have that index, we can query by it.
But remember that any changes to the structure of a database need to happen inside a database request’s onupgradeneeded handler, so we need to up the version of our database to create the index, like this:
// We update the version of the database to 2 to trigger
// onupgradeneeded
let dbReq = indexedDB.open('myDatabase', 2);
dbReq.onupgradeneeded = function(event) {
db = event.target.result;
// Create the nores object store, or retrieve it if it
// already exists.
let notes;
if (!db.objectStoreNames.contains('notes')) {
notes = db.createObjectStore('notes', {autoIncrement: true});
} else {
notes = dbReq.transaction.objectStore('notes');
}// If there isn't already a timestamp index, make one so we
// can query notes by their timestamps
if (!notes.indexNames.contains('timestamp')) {
notes.createIndex('timestamp', 'timestamp');
}
}
First, we update the version of our database to 2, which indicates that the structure of the database is changing, so we need an onupgradeneeded event:
let dbReq = indexedDB.open('myDatabase', 2);
Now we have a version upgrade where the notes object store already exists, so we check if there’s already a notes store with db.objectStoreNames:
if(!db.objectStoreNames.contains('notes'))
and if there’s already one, we retrieve it with dbReq.transaction.objectStore:
notes = dbReq.transaction.objectStore('notes');
Finally, we add an index with createIndex:
if (!notes.indexNames.includes('timestamp')) {
notes.createIndex('timestamp', 'timestamp');
}
The first parameter is the name of our index, and the second is the index’s keyPath.
An index is actually itself an object store, so all items in an index have a key, so if you give an index the keyPath timestamp, then the timestamp of each object in the object store will be its key.
Additionally, there is an optional third options object parameter.
Say our notes had titles and we wanted to require that a note could not be stored if it had the same title as another note.
We could do that by creating a unique title index like this:
notes.createIndex('title', 'title', {unique: true})
To see our new index, once you update onupgradeneeded, refresh index.html in Chrome (you may need to X out of Chrome to see the change), go to Developer Tools > Application > IndexedDB again, and you should be able to see your notes object store:
As you can see, the notes are now listed by their timestamps as their primary keys.
And in fact, as an object store, an index has the same get and openCursor methods that a regular object store would.
For example we could request the first note with a call to:
tx.objectStore('notes').index('timestamp').get(1533144673015)
Now that we’ve got a cool new index, let’s add a mode to our web app to flip the order we display notes in.
First, in db.js, add a global bool variable:
let reverseOrder = false;
Then in getAndDisplayNotes, we just need to update our request:
let tx = db.transaction(['notes'], 'readonly');
let store = tx.objectStore('notes');
// Retrieve the sticky notes index to run our cursor query on;
// the results will be ordered by their timestamp
let index = store.index('timestamp');
// Create our openCursor request; if we're going in reverse, then
// specify the direction as prev, otherwise, we specify it as next
let req = index.openCursor(null, reverseOrder ? 'prev' : 'next');
In store.index(), we retrieve the timestamp with the name we request, just like how we retrieve an object store from the transaction.
Now we can define a cursor request to get back our notes ordered by the timestamp.
index.openCursor has two optional parameters.
The first one, if it isn’t null, lets us specify the range of items we want to retrieve.
For example, if we only wanted the sticky notes from the past hour, we could do:
let anHourAgoInMS = Date.now() - 60 * 60 * 1000;
// IDBKeyRange is a global variable for defining ranges to query
// indices on
let keyRange = IDBKeyRange.lowerBound(anHourAgoInMS)
let req = index.openCursor(keyRange, 'next')
The second parameter is the order we want to retrieve items in, which can be 'prev' or 'next', so we specify our direction with:
reverseOrder ? 'prev' : 'next'
Finally, let’s see this in action; in index.html, add another button for flipping the order of the notes we display:
function flipNoteOrder(notes) {
reverseOrder = !reverseOrder;
getAndDisplayNotes(db);
}
And in index.html, add one more button for flipping the order of the notes
<button onclick="flipNoteOrder()">Flip note order</button>
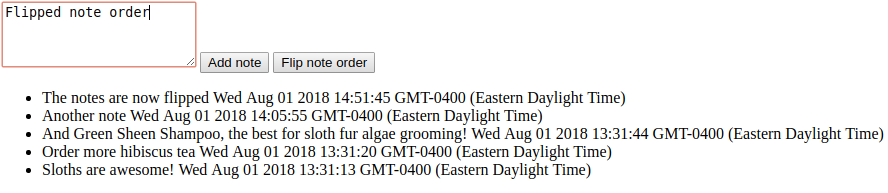
And if you refresh Chrome, your flip button should now work!
The final product!Cool! Now we can change the order we see notes in! Now you’ve seen the basics of IndexedDB.
There are other functionalities we didn’t see in action, like deleting objects, storing binary data in IndexedDB, and multi-field indices, but this should be a good starting point for building web apps with IndexedDB.
As you could see though, the basic IndexedDB API, though powerful, doesn’t really have an ergonomic feel to it.
I don’t know about you, but to me, these on event listeners feel inconvenient to reason about, and those handlers also took some thinking my first time figuring out how to give IndexedDB code test coverage.
 Cool! We have a database named
  Now we have some data stored! And as you can see, our sticky notes in the notes object store are stored as JavaScript objects.
So what was going on in that code?
let tx = db.transaction(['notes'], 'readwrite');
let store = tx.objectStore('notes');
First we start a transaction on our database to write data to our
Now we have some data stored! And as you can see, our sticky notes in the notes object store are stored as JavaScript objects.
So what was going on in that code?
let tx = db.transaction(['notes'], 'readwrite');
let store = tx.objectStore('notes');
First we start a transaction on our database to write data to our 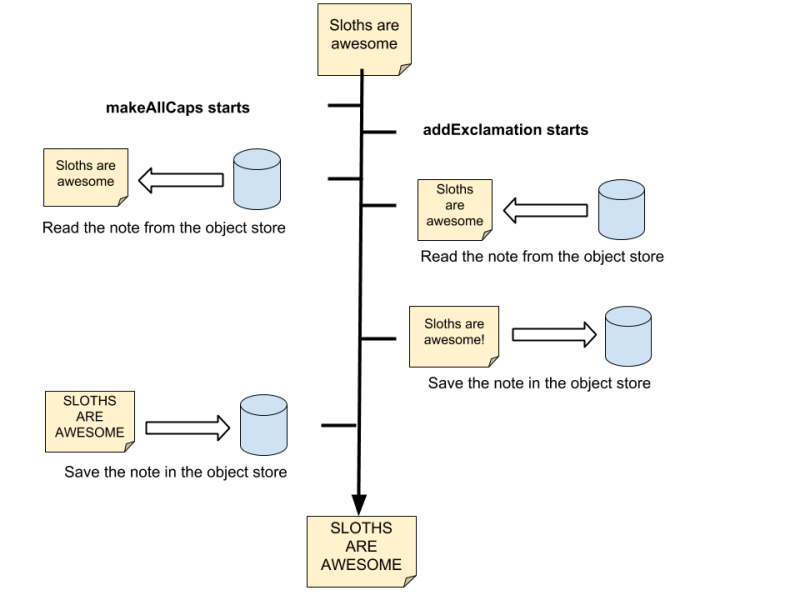 We start the
  The
The  But with transactions, the streetsweeper can sweep branches out of the road and the line painter can paint lines so sloths can safely go for a bike ride!
 Before we move on, one other thing to know is that transactions on the same object store only happen one-at-a-time if they’re modifying data; in other words they’re
 Now for one last thing, let’s make a mode to see the newest notes first and see why this is called IndexedDB!
 As you can see, the notes are now listed by their timestamps as their primary keys.
And in fact, as an object store, an index has the same
As you can see, the notes are now listed by their timestamps as their primary keys.
And in fact, as an object store, an index has the same